Update:
Export artboard to SVG ‘for web’.
- Save as, use artboard
- Choose ‘try’ to export for web
- Choose options
- Careful when choosing ‘responsive’: it somehow adds vector parts that are outside the artboard area to the svg.
SVG profiles
SVG 1.0: all modern desktop and mobile browsers support SVG 1.1, so never choose this option.
SVG 1.1: You will almost always want this.
SVG Tiny/Basic: this is a subset of SVG intended for mobile devices. Only a handful of devices support SVG Tiny and not the full spec, so go for SVG 1.1.
Note: SVG Tiny does not reduce the file size, it’s just a subset of SVG that is adequate for low processing power devices. It will discard gradients, opacity, embedded fonts and filters. Erik Dahlström says: All SVG 1.1 full viewers should be able to display all of the SVG 1.1 Tiny/Basic content (according to spec), and probably all of the SVG 1.2 Tiny content that Illustrator produces too.
Fonts
note: if you don’t have any text in your image this setting doesn’t matter.
- Adobe CEF: never use this option of you intend to display it in browsers. It’s Adobe’s way of embedding fonts in SVG files, as far as I know this is only supported by Adobe’s SVG viewer plugin.
- SVG: this embeds the font as SVG, which is not supported by Firefox, but is a good option if you intend to support only mobile devices (which usually run webkit).
- Create outlines: you will want to do this most of the time, unless you have a large amount of text. If you have a large amount of text you will want to embed the font with WOFF but you will have to do this by hand.
- “Convert to outline” can blow up your SVG files and make them less accessible. That’s why web fonts are a better option.
Subsetting:
- None: this will negate the previous setting and will not embed any font, if you don’t care that the font falls back to some other font in the user’s computer choose this.
- Only Glyphs used: you will want this most of the time if you choose to embed the font. It only embeds the characters used so it doesn’t inflate your file size.
- [rest of subsetting]: this is fairly clear, you can choose to include the entire font or subsets of it. It is only useful if your SVG is dynamic and the text might change based on user input.
Images
this only matters if you are including bitmap images
- Embed: this is usually what you want, it encodes the image as a data uri so that you just upload one file instead of the svg file with it’s companion bitmap images.
- Link: use this only if you have several svg files that reference one bitmap file (so it’s not downloaded every time it renders the svg file).
Note that linked bitmap images won’t display if the SVG is displayed through the <img> tag, because img doesn’t allow loading external resources. Furthermore: webkit has a bug that does not display bitmap images within svg files even if you embed them. In short: use a plain <svg> tag if you intend to embed or link bitmap images, don’t use <img>.
Preserve Illustrator Editing Capabilities
I prefer to save an .ai file as my source image, and to think of the SVG file as an Export for webfeature. That way you focus on reducing file size and have a pristine copy of your vector file with all the editing capabilities. So don’t choose this.
CSS Poperties
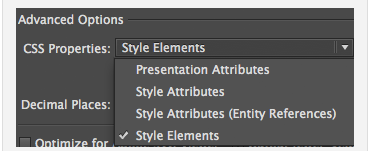
Select the option Style Elements (but see the note below) which has been designed for the web. The other ones are more for pure XML processing (with XSLT for instance). If you don’t plan to modify your SVG code after export, select the default option Presentation Attributes.
Note: if you use ‘style attributes’ it will not work nicely out of the box when you combine several svg files in your HTML (for instance when creating an SVG sprite), since the automatically generated classes will be named the same in multiple files and thus overwrite each other. (todo – see if you can set an offset to the automatically generated classes such as .st1)
Graphic Styles
Illustrator CCwill detect the graphic styles of your artwork and translate them into CSS properties at the top of the document, so that you can easily style your SVG afterwards.
Naming is preserved for layers and objects styles. Look at this sample:

It has two layers named “myCircle” and “mySquare”.

Name your Graphic Styles
I’ve also defined two graphic styles: sandStyle (already applied to the two shapes), and blueSky.

Unused Graphic Styles
In the SVG export options, I select “Style Elements”, and I check “Include Unused Graphic Styles”. It will declare “sandStyle” and “blueSky” as CSS styles in the SVG document. Here is the SVG output generated by Illustrator CC:
<style type="text/css">
.sandStyle{fill:#BFAF8F;stroke:#A6806A;stroke-width:3;stroke-miterlimit:10;}
.blueSky{fill:#338AC4;stroke:#3469B7;stroke-width:3;stroke-miterlimit:10;}
</style>
<g id="mySquare">
<rect x="90.5" y="15.5" class="sandStyle" width="64" height="63"/>
</g>
<g id="myCircle">
<circle class="sandStyle" cx="42" cy="46" r="34.2"/>
</g>
The code is well structured and you can easily modify your styles afterwards or dynamically apply new styles to your elements using JavaScript. Notice the name of the layers “mySquare” and “myCircle” correctly preserved in the SVG. If you want to play with this sample in your browser, click here.
Decimal Places
The default 3 is a sane setting and you can mostly forget about it.
However, if you have a really complicated paths with many points lowering this setting to 1 or even 0 will reduce the file size substantially. But you must be careful because bezier segments are very sensitive to this setting and they might seem a little distorted. So if you lower this setting always make sure it looks acceptable in a browser.
Example – compare 7 vs 1 decimal places (almost no difference but file is 3x smaller)
More Options
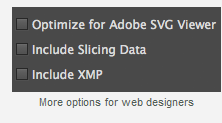
Don’t select the “Optimize for Adobe SVG Viewer” option. SVG is supported by default in all browsers, without any Adobe plugin.
“Include Slicing data” : Well… Slicing?.. No thank you.
“Include XMP” : If you’re working in a super-organized environment, with automated workflows by the NASA, or if you’re insanely maniac, you can add some XML metadata.
Output fewer <tspan> elements:

If your SVG artwork contains a lot of text, this option can dramatically reduce the size of your exported SVG. In this sample, I’ll just write ‘Adobe’ and export it without checking this option:
<tspan x="0" y="0" font-family="'Myriad-Roman'" font-size="136.1154" letter-spacing="-1">A</tspan><tspan x="81.7" y="0" font-family="'Myriad-Roman'" font-size="136.1154">dobe</tspan>
Illustrator CC generated two <tspan> elements. One for the capital “A”, and another one for “dobe”. It’s because the Myriad-Roman applies a specific kerning for the uppercase letters.
Text is problematic in SVG because it’s hard to have a perfect translation from CoolType to SVG without selecting particular glyphs. Adding <tspan> elements does the trick, but you’ll lose the semantic meaning.
If you check the box, Illustrator CC will ignore the kerning positions and create one tspan:
<text transform="matrix(1 0 0 1 36.5907 137.4181)" font-family="'Myriad-Roman'" font-size="136.1154">Adobe</text>
Use <textPath> element for Text on path”

Same as above, my advice is to leverage the <textPath> SVG element, so check this box. Otherwise, it will declare one <tspan> per character.
The code is cleaner with <textpath>
<path id="SVGID_x5F_1_x5F_" fill="none" d="M38.7,308.5c0,0,58.1-234.4,179.6-160.2s138.7,89.2,202.2,2.2S623.7,59,623.7,59"/>
<text><textPath xlink:href="#SVGID_x5F_1_x5F_" startOffset="5%">
<tspan font-family="'MyriadPro-Regular'" font-size="23">A fool thinks himself to be wise, but a wise man knows himself to be a fool.</tspan></textPath>
</text>
Filters and Effects
drop shadow
If you create a drop shadow with Effect > Stylize > Drop Shadow, what actually happens is that AI duplicates the shape, changes the fill color, then rasterizes, blurs and offsets the object.
If you do Object > Expand, you’ll see an image object in the resulting group.
Exporting such a drop shadow will result in large sections of embedded images in your svg (if you choose ’embed images’), or links to external image files
If you want to have pure vector shadows, you could have a look at this article (under ‘100% Vector Drop Shadow – CS6 Style’).
Need to look into this more. Using SVG filters is also possible in AI
In general it is best to avoid any special filters and effects if you can. Keep your shapes solid and as basic as you can. Don’t use Multiply Layers; Just like on PSDs for a web design where PNGs will be exported, avoid any layers set to multiply, because they will not work in the web browser
note: multiply layers do work if you use the export function instead of the ‘save as’ function (see below), but the browser support is not great.
‘Export’ vs ‘save as’
A small test with a shadow (vector) that uses ‘multiply’ transparency:

- The ‘save as’ function could not handle it, no matter what settings I tried

- The export function was able to handle the multiply layer without problems:

It creates the css:
mix-blend-mode: multiplyWhich unfortunately is not yet supported by Internet Explorer among others
For more about this css property see this css-trick article.
Exporting AI (dynamic) symbols to svg
See this video for an explanation on dynamic symbols

Of course it makes sense to use symbols for these trees. Btu what do they look like when exported to SVG?
This is the definition of a tree:
<symbol id="tree" viewBox="-63.2 -42.1 126.4 84.2">
<linearGradient id="SVGID_1_" gradientUnits="userSpaceOnUse" x1="32.9718" y1="-55.9514" x2="-3.0211" y2="-13.0567">
<stop offset="0" style="stop-color:#FFFFFF;stop-opacity:0"/>
<stop offset="0.3256" style="stop-color:#D4E9CC;stop-opacity:0.3256"/>
<stop offset="0.7842" style="stop-color:#9CCB8A;stop-opacity:0.7842"/>
<stop offset="1" style="stop-color:#86C070"/>
</linearGradient>
<polygon class="st0" points="63.2,-30.6 -30.6,-41.6 -19.3,-26.7 "/>
<polygon class="st1" points="-30.1,-42.1 2.4,-29.9 -6.3,-27 0.3,-25.3 -10.6,-16.4 -1.9,-16.9 -12.1,-8.5 -4.2,-9.4 -15.4,2.1
-7.7,0.8 -20.5,12.3 -13.2,11.6 -26.2,25.2 -18.8,23.8 -29,32.7 -24,33 -30.7,42.1 -30.3,42.1 -37,33 -32,32.7 -42.1,23.8
-34.9,25.2 -47.7,11.6 -40.5,12.3 -53.2,0.8 -45.6,2.1 -56.6,-9.4 -48.8,-8.4 -58.9,-16.8 -50.2,-16.3 -61.1,-25.3 -54.6,-26.9
-63.2,-29.8 -31,-42.1 "/>
<polyline class="st2" points="-30.7,42.1 -24,33 -29,32.7 -18.8,23.8 -26.2,25.2 -13.2,11.6 -20.5,12.3 -7.7,0.8 -15.4,2.1
-4.2,-9.4 -12.1,-8.5 -1.9,-16.9 -10.6,-16.4 0.3,-25.3 -6.3,-27 2.4,-29.9 -30.1,-42.1 "/>
</symbol>
And this is one instance:
<use xlink:href="#tree" width="126.4" height="84.2" x="-63.2" y="-42.1" transform="matrix(0.8343 0 0 -0.8343 157.7009 35.123)" style="overflow:visible;"/>
As a comparison, this is the definition of one tree when no symbols are used.
<g id="tree_4_">
<linearGradient id="SVGID_1_" gradientUnits="userSpaceOnUse" x1="185.2084" y1="81.8019" x2="155.1804" y2="46.0159">
<stop offset="0" style="stop-color:#FFFFFF;stop-opacity:0"/>
<stop offset="0.3256" style="stop-color:#D4E9CC;stop-opacity:0.3256"/>
<stop offset="0.7842" style="stop-color:#9CCB8A;stop-opacity:0.7842"/>
<stop offset="1" style="stop-color:#86C070"/>
</linearGradient>
<polygon class="st0" points="210.4,60.7 132.2,69.8 141.6,57.4 "/>
<polygon class="st1" points="132.6,70.2 159.7,60 152.5,57.6 157.9,56.2 148.8,48.8 156.1,49.2 147.6,42.2 154.2,43 144.9,33.4
151.3,34.5 140.6,24.9 146.7,25.5 135.9,14.1 142,15.3 133.5,7.9 137.7,7.6 132,0 132.4,0 126.8,7.6 131,7.8 122.5,15.2
128.6,14.1 117.9,25.5 123.9,24.8 113.3,34.4 119.7,33.4 110.5,42.9 117,42.2 108.5,49.2 115.8,48.8 106.8,56.2 112.2,57.6 105,60
131.9,70.2 "/>
<polyline class="st2" points="132,0 137.7,7.6 133.5,7.9 142,15.3 135.9,14.1 146.7,25.5 140.6,24.9 151.3,34.5 144.9,33.4
154.2,43 147.6,42.2 156.1,49.2 148.8,48.8 157.9,56.2 152.5,57.6 159.7,60 132.6,70.2 "/>
</g>
The size of the svg with symbols is 2385 characters, that of the no-symbol svg is 6079 (more than 2.5 times bigger)
Caveats:
The above example uses only resized instances of the symbol.
When using the features of the new dynamic symbols from AI to change the color, strokes or effects of a particular instance, like this:

.. the export will result in this instance being expanded and thus not taking advantage of the symbol definition. This seems to be a limitation of the AI export function and I haven’t found a solution for it yet.
Optimize your artwork
Reduce the amount of vectors with the warp tool, the simplify tool or the pencil tool.
See this post